What This Guide Covers
Surface finish is one of the most overlooked yet critical aspects of plastic injection molding. The finish you choose affects not just how your part looks, but also its functionality, cost, and production timeline. This comprehensive guide explains the five most common surface finishes in the plastic injection molding industry, helping you make informed decisions for your custom plastic injection molding project.
What you’ll learn:
- Understanding plastic injection molding surface finish standards
- The 5 most common finishes and when to use them
- Cost implications and production considerations
- How to select the right finish for your application
- Design tips for optimal results
Whether you’re working with a plastic injection molding manufacturer for automotive plastic injection molding parts or seeking prototype Dienstleistungen im Bereich Kunststoff-Spritzgießen, understanding surface finishes ensures better outcomes.
Understanding Surface Finishes in Plastic Injection Molding
After spending a decade working with Kunststoff-Spritzguss companies across automotive, consumer electronics, and medical device sectors, I’ve learned that surface finish isn’t just about aesthetics—it fundamentally impacts part performance and manufacturing costs.
Last month, a consumer electronics client came to us wanting a mirror-polished finish on their smartphone case prototype. Beautiful idea, but the polishing would have added $8,000 to the mold cost and extended their timeline by three weeks. After discussing their actual needs, we switched to a fine-texture finish that looked nearly as good, cost 60% less, and shipped on schedule.
But I’ve also seen companies cut corners on finish selection. An automotive client once specified a basic as-molded finish for dashboard components to save money. The result? Visible gate marks and flow lines that screamed “cheap.” They ended up requesting a re-mold with proper texturing at twice the original cost.
Surface finish in plastic injection molding affects:
- Visual appearance and perceived quality
- Mold manufacturing cost and complexity
- Production cycle time
- Part release from the mold
- Friction and wear characteristics
- How well the part hides defects like sink marks or flow lines
What is Plastic Injection Molding Surface Finish?
Surface finish refers to the texture and appearance of the cavity surface inside your injection mold, which directly transfers to your molded parts. The plastic injection molding machine pushes molten plastic into the mold cavity, and when it cools and solidifies, it replicates the mold surface with remarkable accuracy.
Die plastic injection molding service provider achieves different finishes through various machining, polishing, texturing, and chemical etching processes applied to the mold steel. Understanding these options helps you work effectively with any plastic injection molding company, whether you’re sourcing locally with plastic injection molding near me searches or working with plastic injection molding China manufacturers.
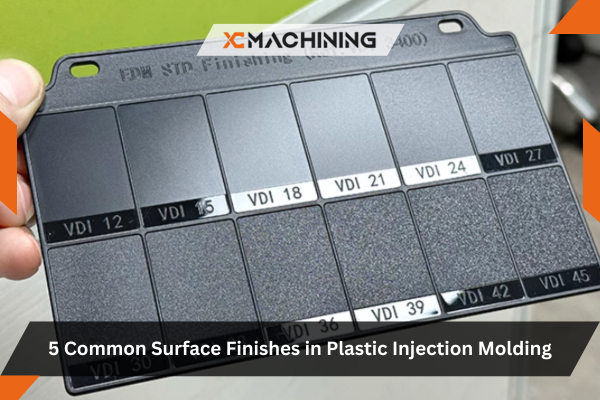
Industry Standards: SPI Surface Finish Classifications
The Society of the Plastics Industry (SPI) established finish standards that most precision plastic injection molding providers follow. These standards provide a common language between customers and manufacturers.
SPI GradeFinish TypeProcessTypical Ra ValueCommon Use
A-1 Diamond Buff #3 diamond buff 0.012-0.025 μm High-gloss lenses, mirrors
A-2 Diamond Buff #6 diamond buff 0.025-0.05 μm Medical devices, optics
A-3 Diamond Buff #15 diamond buff 0.05-0.1 μm Consumer electronics
B-1 Paper Polish 600 grit paper 0.1-0.15 μm Automotive interior
B-2 Paper Polish 400 grit paper 0.15-0.28 μm General purpose
B-3 Paper Polish 320 grit paper 0.28-0.35 μm Less visible surfaces
C-1 Stone Texture 600 grit stone 0.35-0.4 μm Textured parts
C-2 Stone Texture 400 grit stone 0.4-0.56 μm Medium texture
C-3 Stone Texture 320 grit stone 0.56-1.0 μm Heavy texture
D-1 Dry Blast Dry blast/bead 1.0-2.0 μm Rough texture
D-2 Dry Blast Coarse blast 2.0-5.6 μm Very rough
D-3 Dry Blast Heavy blast 5.6-11.0 μm Aggressive texture
The 5 Most Common Surface Finishes in Plastic Injection Molding
Based on my experience with custom plastic injection molding projects, these five finishes account for about 85% of all production molds.
1. SPI A-2: Fine Polish (Diamond Buffed)
What it is: This is a high-gloss, mirror-like finish achieved through progressive diamond buffing of the mold surface.
The process: Mold makers start with fine machining, then progressively polish using diamond compounds—typically #6 diamond buff for A-2 grade. The result is a smooth, reflective surface with minimal visible machining marks.
Best applications:
- Medical devices requiring sterilization and easy cleaning
- Optical components like lenses and light guides
- Consumer electronics where premium appearance matters
- Transparent parts where clarity is critical
- High-end cosmetics packaging
Real-world insight: I recently worked on a project for LED light diffusers where clarity was everything. We specified A-2 finish, and the transparent ABS plastic injection molding parts transmitted 92% of light versus only 78% with a standard B-2 finish. The visual difference was night and day.
Cost impact: Adds $2,000-$8,000 to mold cost depending on cavity size. Also extends mold manufacturing time by 1-2 weeks.
Pros:
- Premium visual appearance
- Excellent for transparent parts
- Easy to clean and maintain
- Professional, high-quality look
Cons:
- Expensive mold preparation
- Shows every defect (sink marks, flow lines, contamination)
- Requires pristine molding conditions
- Longer cycle times (hot mold for good replication)
2. SPI B-2: Standard Paper Polish
What it is: This is the most common general-purpose finish in the plastic injection molding industry. It provides a semi-gloss appearance that balances cost and quality.
The process: Achieved using 400-grit sandpaper in a systematic polishing pattern. Most plastic injection molding manufacturers consider this their “standard” finish.
Best applications:
- Consumer products and housings
- Automotive interior components
- Electronic enclosures
- General industrial parts
- When cost efficiency matters
Real-world insight: About 60% of our production molds use B-2 finish. It’s the sweet spot where parts look professional without the premium cost of higher polishes. For prototype plastic injection molding, I almost always recommend B-2 unless the client has specific requirements.
Cost impact: Usually included in base mold pricing. Minimal additional cost.
Pros:
- Kostengünstig
- Good visual appearance
- Hides minor defects better than high polish
- Fast mold preparation
- Suitable for most applications
Cons:
- Not suitable for optical applications
- Won’t achieve mirror finish
- Visible sanding patterns on some plastics
- May show directional grain
3. SPI C-2: Medium Stone Texture
What it is: A matte, slightly rough surface created by stone grinding. This finish provides a non-reflective, uniform appearance.
The process: Mold surfaces are ground with 400-grit stones, creating a consistent texture pattern that effectively hides imperfections.
Best applications:
- Automotive exterior components
- Power tool housings
- Industrial equipment enclosures
- Parts where glare must be eliminated
- Applications requiring grip or non-slip properties
Real-world insight: Working with automotive plastic injection molding companies, I’ve found C-2 texture perfect for dashboard components and interior trim. It hides the inevitable sink marks and weld lines that occur in complex automotive plastic injection molding automotive parts while providing that professional matte look customers expect.
Cost impact: Moderate—adds $500-$2,000 to mold cost. Faster than polishing.
Pros:
- Hides defects exceptionally well
- Non-reflective appearance
- Provides some grip
- Faster mold prep than polishing
- Consistent, professional look
Cons:
- Not suitable for transparent parts
- Can be difficult to clean
- May affect dimensional accuracy slightly
- Texture can vary between mold makers
4. SPI D-3: Heavy Dry Blast Texture
What it is: A rough, deeply textured finish created by blasting the mold surface with abrasive media.
The process: Coarse glass beads or aluminum oxide are blasted against the mold surface, creating deep pits and textures.
Best applications:
- Appliance housings
- Heavy-duty industrial equipment
- Exterior architectural components
- Anti-slip surfaces
- Parts requiring maximum defect concealment
Real-world insight: I specified D-3 finish for a series of industrial motor housings where function mattered far more than appearance. The heavy texture completely concealed weld lines from multiple gates and gave the parts a rugged, industrial appearance that matched the brand aesthetic.
Cost impact: Low to moderate—$300-$1,500. Fast process but may require masking.
Pros:
- Completely hides defects
- Fast, economical process
- Provides excellent grip
- Durable, wear-resistant appearance
- Easy part release from mold
Cons:
- Very rough appearance
- Difficult to clean
- Not suitable for visible consumer products
- Can trap contaminants
- Affects dimensional tolerances
5. Custom Textures and Patterns
What it is: Specialized finishes including leather grains, geometric patterns, wood grains, or brand-specific textures applied through photo-chemical etching or laser engraving.
The process: Custom textures are typically created by specialized texture shops using chemical etching or laser technology to reproduce patterns in the mold surface. Companies like Mold-Tech offer thousands of standard texture patterns.
Best applications:
- Automotive interior surfaces (leather, carbon fiber look)
- Consumer electronics with brand-specific patterns
- Appliances requiring distinctive appearance
- Medical devices with specific grip requirements
- Premium packaging
Real-world insight: We recently worked with an automotive client who wanted a “soft-touch” leather grain on door panel inserts. Using a Mold-Tech MT-11030 texture with soft-touch TPE material, we achieved a premium appearance that tested higher in customer focus groups than competitors using real leather at 10x the cost.
Cost impact: Significant—$1,000-$10,000+ depending on complexity and surface area.
Pros:
- Unique, branded appearance
- Can simulate premium materials
- Excellent defect concealment
- Enhanced grip and tactile feel
- Differentiates products
Cons:
- Expensive custom work
- Long lead times (2-4 weeks additional)
- Difficult to modify later
- May complicate part ejection
- Requires expertise to select properly
How to Select the Right Surface Finish
When working with a plastic injection molding service provider, consider these factors:
Functional Requirements
Optical clarity needed?
- Choose SPI A-1 or A-2 for transparent parts
- Higher polish finishes transmit more light
- Critical for lenses, light guides, and displays
Durability and wear?
- Textured finishes (C and D grades) resist scratching better
- High polish shows every scratch and fingerprint
- Consider end-use environment
Grip or non-slip?
- Medium to heavy textures provide friction
- Essential for handles, grips, and controls
- Test with actual use cases
Aesthetic Goals
Brand perception:
- High polish = premium, high-tech
- Medium texture = professional, industrial
- Heavy texture = rugged, durable
Visibility:
- Visible surfaces justify higher finish investment
- Internal or hidden surfaces: use economical finishes
- Consider lighting conditions in use environment
Überlegungen zum Budget
Mold cost impact:
Finish GradeAdded Mold CostTime to Prepare
A-2 Polish $2,000-$8,000 1-2 weeks
B-2 Standard $0-$500 Included
C-2 Texture $500-$2,000 3-5 days
D-3 Blast $300-$1,500 2-3 days
Custom Texture $1,000-$10,000+ 2-4 weeks
Production considerations:
- Highly polished molds require longer cooling times
- Textured finishes eject more easily (faster cycles)
- Some finishes require mold maintenance more frequently
Materielle Erwägungen
Different plastic resins respond differently to surface finishes:
ABS plastic injection molding:
- Takes polish extremely well
- Shows excellent detail in textures
- Popular for consumer products
Polycarbonat (PC):
- Achieves excellent optical clarity with high polish
- Scratch-resistant when polished
- Common in automotive and electronics
Polypropylen (PP):
- Difficult to achieve high polish
- Better with textured finishes
- Common in automotive and packaging
TPE/TPU (soft-touch materials):
- Works beautifully with leather-grain textures
- Creates premium tactile feel
- Popular in automotive and consumer goods
Design Tips for Better Surface Finishes
Based on working with precision plastic injection molding manufacturers, here are critical design considerations:
Wall thickness uniformity:
- Inconsistent walls cause sink marks that even heavy texture won’t hide
- Maintain 2-4mm nominal thickness for most applications
- Avoid sudden transitions
Draft angles:
- Textured surfaces require more draft for ejection
- High polish: 1-2° minimum
- Medium texture: 2-3° minimum
- Heavy texture: 3-5° minimum
Gate location:
- Place gates where gate marks can be hidden
- Consider how finish will reveal or hide gate vestige
- Plan for secondary operations if needed
Sharp corners:
- Difficult to polish into tight corners
- Texture can obscure radius transitions
- Always specify minimum radii (0.5mm minimum)
Working with Plastic Injection Molding Companies
When sourcing from a plastic injection molding manufacturer, communicate surface finish requirements clearly:
In RFQ specifications, include:
- Specific SPI grade or custom texture number
- Reference samples if available
- Functional requirements (optical, grip, etc.)
- Budget constraints
- Acceptable tolerance on texture depth
Questions to ask providers:
- Do they have in-house texturing or outsource?
- Can they provide finish samples before committing?
- What’s their experience with your specific requirements?
- Do they offer standard texture libraries?
- What’s the lead time impact for your finish choice?
Red flags:
- Provider can’t explain finish options clearly
- No texture or polish samples available
- Vague cost estimates for finish work
- Limited experience with your material-finish combination
Schlussfolgerung
Surface finish in plastic injection molding is far more than a cosmetic choice—it impacts functionality, manufacturability, cost, and timeline. The five common finishes covered here—from mirror polish (A-2) to heavy texture (D-3)—each serve specific purposes.
For most custom plastic injection molding projects, SPI B-2 standard polish provides the best balance of cost and quality. When working on prototype plastic injection molding, start conservative and add finish complexity only where it adds real value.
The key is matching finish to actual requirements rather than over-specifying. Work closely with your plastic injection molding service provider early in the design process. They can suggest finishes that achieve your goals while optimizing cost and production efficiency.
Whether you’re developing automotive plastic injection molding automotive parts, consumer electronics, or industrial components, understanding these five surface finishes helps you make informed decisions that lead to better products and more successful projects.
What are the five most common surface finishes in plastic injection molding?
The five common finishes are: (1) Fine Polish (SPI A-2), (2) Standard Paper Polish (SPI B-2), (3) Medium Stone Texture (SPI C-2), (4) Heavy Dry Blast Texture (SPI D-3), and (5) Custom Textures/Patterns.
How does SPI A-2 (fine polish) benefit plastic parts?
SPI A-2 offers a high-gloss, mirror-like appearance that’s ideal for optical parts, medical devices, and electronics. It also makes parts easier to clean, though it’s more expensive and highlights every defect.
Why would a designer choose SPI B-2 (standard paper polish)?
B-2 is cost-effective, provides a professional semi-gloss look, hides some minor defects, and maintains fast mold preparation—making it well-suited for general-purpose parts.
Can texture finishes improve grip or hide flaws on parts?
Yes. Finishes like C-2 (stone texture) and D-3 (heavy dry blast) create a non-reflective, textured surface that conceals defects like flow lines and provides better grip.
What factors should influence the choice of mold surface finish?
Design decisions should weigh functional needs (optical clarity, grip), aesthetic goals (premium vs rugged), material type, draft angles, budget, and how finish impacts mold cost and production cycle time.


