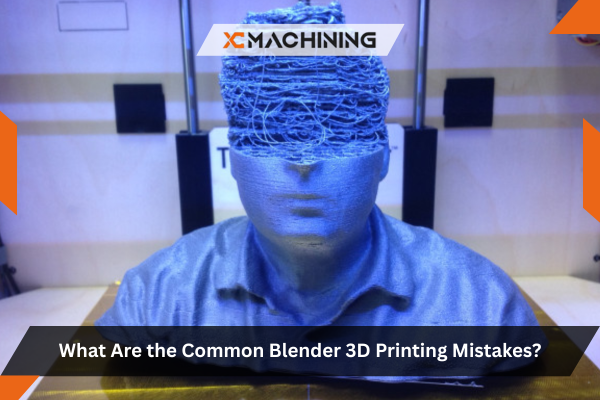
Have you ever spent hours perfecting a 3D model in a blender, only to discover it just won’t print right? Maybe the layers crumble, or the shape doesn’t come out as expected. If you’ve faced these problems, you are not alone. Many enthusiasts stumble with blender 3d printing, struggling to transform their digital dreams into physical reality. It can feel confusing, especially if you’ve invested time learning the software. But fear not because we’re about to explore why these mistakes happen.
The key to fixing blender 3D printing mistakes is a mixture of checking mesh integrity and adjusting your print settings. Make sure your model is manifold, has no loose vertices, and fits your printer’s size limits. Always preview the slicing process. Keep geometry simple and strong. And finally, use modifiers carefully to avoid unexpected issues. That’s it in a nutshell.
In this article, we’ll dive into the most common mistakes you should avoid when creating models in a blender for 3D printing. We’ll also explore tips and resources to ensure successful prints.
Blender 3D Printing: A Friendly Overview
Blender 3D printing can feel like magic when you get it right. You sculpt a virtual object, slice it for your 3D printer, and watch it come to life. However, there are common pitfalls that can spoil the fun. Understanding these pitfalls will help you create cleaner and stronger prints.
Misaligned Faces
Misaligned faces happen when certain edges or vertices are out of place, resulting in gaps or overlaps. These errors can make your 3D printer read the model incorrectly. Always inspect your model in Wireframe Solid view to catch misalignment early.
Overly Complex Geometry
A dense mesh complicates printing because your slicer must process each vertex and face. This can lead to long slicing times or file errors. Simplifying your geometry with decimating modifiers or retopology helps your model print smoothly without losing detail.
Poor Scale Setup
When you overlook scale, your printed piece might end up massive. Blender’s default units might not match your printer’s. Always set your scene dimensions properly before modeling. Double-check the scale in your slicer software to avoid wasted time, material, and frustration.
Understanding Non-Manifold Edges
Non-manifold edges form when a mesh’s geometry folds, leaving open edges or inverted normals. This confuses slicers, causing them to misinterpret the shape. In blender, use the 3D Print Toolbox add-on to detect and fix these errors.
If an edge connects more than two faces, you’ll see non-manifold warnings. Be sure to merge duplicate vertices and remove interior faces. A clean mesh ensures your model prints with proper walls and no strange internal gaps.
Inconsistent Wall Thickness
Wall thickness is crucial for both stability and print quality. If walls are too thin, they might collapse during printing. If they’re too thick, you waste filament. Always set a consistent thickness that suits the nozzle size and material used.
Before finalizing, check the thickness in the blender’s viewport by enabling the Measurement or Edge Length tool. This gives a quick overview of wall dimensions. Also, consult your printer manufacturer’s guidelines. Following recommended minimums helps avoid structural weaknesses from excessive thickness.
Ignoring Overhang Angles
Overhangs are areas where your printer extrudes filament with little to no support beneath. If the angle is steep, you might see sagging. Keep an eye on overhang angles; anything beyond 45 degrees might need support or some design changes.
Preview your model’s overhangs in the slicer before printing. Slicers highlight problem spots that need support. In a blender, you can also design built-in supports or alter geometry to reduce overhangs. Minimizing steep angles can save time while improving surface quality.
Skipping Support Structures
Some shapes, like arches or complex geometries, can’t print well without support structures. Skipping supports leads to drooping or incomplete prints. While adding supports consumes more material and requires cleanup, it’s often necessary to maintain the intended shape and strength.
Below is a quick look at common support types, along with their pros and cons.
| Support Type | Pros | Cons |
|---|---|---|
| Lattice | Stable for overhangs | Extra filament usage |
| Tree | Less contact | Harder to slice |
| Custom | Tailored shape, minimal waste | More design required |
Forgetting To Check Orientation
Orientation determines where supports are placed and how layers bond. Printing a model upright might reduce the footprint but create overhangs. Conversely, laying it flat can offer better stability but might obscure details. Always experiment with orientations in your slicer. Blender 3D Printing techniques can help optimize these settings for better results.
For the best results, stress points should be considered. Vertical print might withstand differently than horizontal print. Double-check your model’s largest flat surface, as printing on that surface can enhance adhesion. Finding the sweet spot for minimal support is key. Blender 3D Printing also allows users to refine their designs before slicing, ensuring an efficient and high-quality print.
Overlooking Blender 3D Printing Check Tools
Blender offers a built-in add-on called 3D Print Toolbox to help spot issues like overhangs, non-manifold edges, and thin walls. This is a quick way to ensure your model is printer-ready. By using these tools regularly, you avoid surprises mid-print.
Remember, blender 3d printing success hinges on proper pre-checks. The add-on highlights spots that may fail during slicing. After running checks, fix the highlighted areas before exporting your file. This simple step saves time, material, and frustration down the road.
Not Optimizing Infill Settings
Infill patterns determine your model’s internal structure. Too little infill can cause weak prints, while too much raises print time. Common patterns like grids or honeycombs offer a balance. Pick an infill percentage that gives strength without skyrocketing print duration.
Experiment with test cubes to find your ideal infill. Start low, then increase if parts feel fragile. Some slicers let you vary infill in different regions, saving material where it’s not needed. Keep prints sturdy without extending your printing schedule.
Failing To Apply Scale And Transformations
In a blender, transformations like scale or rotation might not bake into the final model unless you apply them. If you forget, the exported file can have unexpected dimensions. This is problematic in blender 3d printing, where accurate size is critical.
Always use ‘Apply Scale’ and ‘Apply Rotation’ under the Object menu before exporting. This ensures what you see in the viewport is what your slicer receives. It’s a step, but it can prevent headaches once the print job is running.
Neglecting File Formats
STL is the most common format for 3D printing, but AMF can be used. If you choose the wrong file type or incorrect export settings, your model might lose details. Ensure you pick a format compatible with your slicer’s requirements.
Check your file size. A high polygon model might exceed slicer limits, or a decimated file could appear blocky. Most printers and slicers work fine with standard STL at moderate resolution. Consistency keeps your process smooth from screen to machine.
Poor Mesh Cleanup
Random floating vertices, hidden faces, or leftover geometry can sabotage prints. In blender 3d printing workflows, these stray elements cause slicing errors or lumps. Clean your mesh by removing doubles, deleting hidden elements, and recalculating normals to keep the model pristine.
Use tools like ‘Remove Doubles’ (now ‘Merge by Distance’ in newer Blender versions) to automatically fix overlapping vertices. After that, switch to Edit Mode and visually inspect problem areas. A quick cleanup can improve print quality and reduce printer jams.
Ignoring Material Limitations
Different materials have different printing demands. PLA prints easily, while ABS needs heat and an enclosed environment. TPU is flexible but challenging to feed. In blender 3d printing, pick materials that suit your model’s function and your printer’s abilities to prevent misprints.
For each filament type, follow the recommended bed temperature and printing speed. Improvising these settings leads to warping, stringing, or poor adhesion. Always store your filaments properly to keep moisture at bay. Dry material flows better, ensuring a reliable print.
Over-Detailing Small Parts
High detail can be on screen, but it is problematic on tiny prints. Your printer’s nozzle size sets a minimum resolution. Going beyond that can result in blobs or missing features. It’s best to simplify details or print larger pieces for clarity.
In Blender 3D Printing, if your model has text or logos, do a test. Consider embossing or engraving at a readable depth. Alternatively, add these elements after printing if they don’t need to be part of the structure. An approach keeps prints detailed and functional.
Not Checking Final Print Preview
Most slicers offer a layer-by-layer preview. Skipping this step means you might miss floating segments, infill gaps, or misplaced supports. A quick scan of the preview can reveal potential issues early, saving you time and filament in the long run.
Look for overhangs without supports, areas with thin walls, or layers that start in mid-air. You spot a problem, return to the blender, fix it, and re-export. This final check acts like a safety net, making sure your design is printable.
Forgetting Post-Processing Steps
Even the best print can benefit from a little sanding priming. Many ignore these steps, leaving raw layer lines or rough edges. Taking time to smooth surfaces, fill gaps, and add finishes can transform a good print into something amazing.
Remove excess support material carefully to avoid scarring the print. If painting, use thin layers to preserve detail. Some materials like ABS can be smoothed with acetone vapors. Proper post-processing not only enhances appearance but also adds durability to functional parts.
Conclusion
Successfully turning digital creations into physical objects requires careful planning and attention to detail. By avoiding the most common mistakes—like improper wall thickness, non-manifold edges, and ignoring support structures—you set yourself up for smoother, more reliable prints. Each tweak you make in the blender helps ensure a truly satisfying final result.
Blender 3d printing can be a truly rewarding journey once you understand these pitfalls. Keep refining your workflow, and you’ll enjoy stable, accurate, and visually striking prints time after time.
FAQ
- Q1: Why is my model not sticking to the print bed?
This usually happens if your bed isn’t level or your initial layer is set too high. Also, certain materials need a heated bed or adhesives like glue sticks. Checking temperature settings and ensuring a flat surface can greatly improve bed adhesion.
- Q2: Can I use Blender’s modifiers for 3D printing?
Absolutely. Modifiers like Subdivision Surface, bevel, or Solidify can help refine shapes thoroughly. Just remember to apply them before exporting, or you could end up with unexpected geometry. Always preview the final mesh so you know exactly what you’re printing.
- Q3: Should I print with 100% infill for maximum strength?
Not always. While 100% infill provides solid parts, it drastically increases print time and uses more material and weight costs. Often, 20-50% infill with a strong pattern is enough. Reserve 100% for mechanical parts that really need that extra density.


