
Have you ever seen a shiny metal or plastic part and wondered how people make just one or two samples without setting up an entire factory line? If that sounds like a mystery, you’re in the right place. Many product designers and engineers solve this challenge with a CNC milling prototype approach. It’s an efficient way to create test parts quickly without the long wait or big expense of mass production.
A CNC milling prototype is a sample part made by a computer-controlled milling machine. In this blog, we’ll walk you through what CNC milling is, how prototypes come to life, and which steps ensure accurate, functional parts. We’ll also discuss common materials, typical workflows, and best practices to make your first (or next) project a success.
The Rise Of CNC Milling Prototype
CNC Milling started gaining recognition in the late 20th century. It offered a game-changing approach: shaping blocks of material with computer control. Early machines were bulky and slow, but technology advanced swiftly. Today, a CNC milling prototype can be produced rapidly, fitting into high-tech labs or even small workshops.
Early Numerical Controls
Originally, engineers relied on punched tape or cards to program tool movements. Advanced milling techniques followed these codes meticulously. Though primitive compared to modern systems, it set the foundation for automated part creation, fueling industries from aerospace to automotive in their development efforts.
The Shift To CAD/CAM
Once computers became affordable, designers switched from manual drafting to CAD software. CAM then converted digital designs into toolpaths. This synergy simplified the milling process, cutting down human error. Result? Faster turnaround times and smoother transitions from concept to real-world part.
Affordable Precision
As hardware costs dropped, hobbyists and small businesses also embraced CNC. Desktop milling machines let innovators craft prototypes without giant factory budgets. Suddenly, a CNC milling prototype for a robot arm or custom drone part became feasible for almost anyone with a good idea.
Understanding CNC Milling
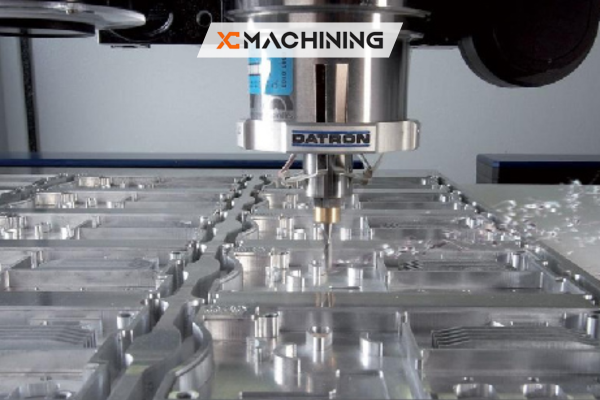
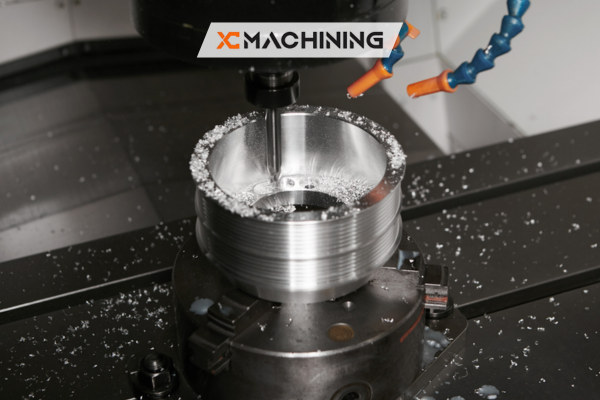
CNC stands for Computer Numerical Control. It’s like giving a computer a detailed map of how to move a cutting tool around a block of material, slicing off chips until a shape appears. Think of it as sculpture by subtraction. The machine’s spindle spins a cutting tool (such as an end mill), and the part remains clamped on the table or vice. Each pass removes a bit more material until the prototype meets precise design specs.
This subtractive method contrasts with additive 3D printing. With 3D printing, you build up layers from nothing. With CNC milling, you carve away layers from a bigger chunk. One advantage of milling is that parts can be made from dense metals or special plastics that might be tough or impossible to print.
For advanced geometry, machines can move on multiple axes—some even up to 5 axes. This means the cutting tool can tilt and rotate around the workpiece, reaching angles that a simple 3-axis setup cannot. The result? Complex surfaces and contours become easy.
Common Materials For CNC Milling Prototype
Prototypes can be milled from a wide range of materials, each with unique pros and cons. Here’s a quick rundown:
- Aluminum: Lightweight and easy to machine, popular for mechanical prototypes.
- Steel: Strong durable, but may require slower cutting speeds.
- Stainless Steel: Rust-resistant, good for medical or food-related parts.
- Brass: Great machinability, excellent for gears or decorative parts.
- Plastics (ABS, Nylon, Delrin): Cost-effective, easy to cut, used for quick test-fittings.
Some advanced prototypes use titanium or carbon-fiber composites, but those can push up costs. For most, aluminum and ABS plastics are a great start: easy to work with and widely accessible.
The CNC Milling Prototype Workflow
Every CNC milling prototype generally follows a similar path, though details can vary.
Step 1: Concept And Design
It all starts with CAD software like SolidWorks, Fusion 360, or Inventor. You create a 3D model of the part, including every hole, fillet, and slot. The accuracy here matters because the face milling operations will follow your digital blueprint.
Step 2: CAM And Toolpath Creation
CAM software (sometimes built into the same program) translates your 3D model into a series of machine instructions. These instructions, known as G-code, tell the CNC machines where to move the cutting tool and how fast to spin it. The CAM stage is crucial—it sets the cutting strategy, including how deep each pass should be cut.
Step 3: Machine Setup
An operator or engineer installs the right cutting tool (end mill, ball nose, drill bit) into the spindle. They clamp or fixture the material block onto the mill’s work table. They also zero out the machine, so it knows the starting reference point (the “origin”).
Step 4: Milling
Press “Start,” and the mill follows the G-code instructions. The tool whirls at thousands of RPM, carefully shaving material. Depending on complexity, this can take from minutes to hours. The machine might change tools automatically for different features—like drilling holes and then chamfering edges.
Step 5: Inspection And Finishing
Once the machine is done, you remove the part. Inspect critical dimensions with calipers or coordinate measuring machines (CMM). If everything checks out, you can do finishing steps like sanding rough edges or applying coatings. Voila! Your CNC milling prototype is complete.
Table: Selecting Material For Your Prototype
Here’s a quick comparison of popular materials:
| Material | Machinability | Strength | Weight | Cost | Common Applications |
|---|---|---|---|---|---|
| Aluminum (6061) | Easy to Machine | Moderate | Lightweight | Affordable | Drones, automotive parts, enclosures |
| ABS Plastic | Very Easy | Low | Very Light | Very Low | Consumer goods, fit testing |
| Stainless Steel | Moderate | High | Heavy | Higher | Medical tools, structural components |
| Brass | Easy | Moderate | Moderate | Moderate | Gears, decorative pieces, connectors |
| Titanium | Hard | Very High | Lightweight | Expensive | Aerospace parts, implants, sports gear |
(Note: Machinability is a general scale; cutting speeds and tooling differ by machine and alloy grade.)
Comparing CNC Milling Prototype To Other Processes
CNC Turning
CNC Turning involves spinning the workpiece instead of the tool. It’s ideal for cylindrical parts like shafts or pulleys. While you can make a prototype this way, it’s limited if your design has complex shapes beyond round geometry.
3D Printing
Additive processes layer up material. Great for highly detailed or hollow parts you can’t easily machine. However, not all printers handle tough metals well. Also, the surface finish may require post-processing if you need a polished look.
Injection Molding
If you need thousands or millions of plastic parts, injection molding is efficient. However, the upfront cost for molds is high. For just a few prototypes, CNC milling is usually cheaper and faster. No expensive tooling is required.
Sheet Metal Fabrication
Sheet metal fabrication processes bend and cut thin metal sheets. For enclosures and brackets, this might be more suitable. But if your design is a bulky block or has pockets, milling is the winner. The key is matching the process to your design.
Best Practices For CNC Milling Prototype
You’ve got a design. You’re itching to press “Start.” Before you do, consider these tips:
- Design For Machinability: Avoid overly narrow channels or super-deep pockets that require specialty tools.
- Choose The Right Tool: A roughing tool for removing bulk material, then a finishing tool for smooth surfaces.
- Mind The Workholding: Ensure you clamp or fixture the part securely. Vibrations kill accuracy.
- Tweak Speeds And Feeds: Different materials prefer different cutting speeds. A quick reference table or advice from an experienced machinist helps.
- Leave A Finishing Allowance: If you need a perfect surface, plan multiple passes with a finishing allowance to remove minimal material at the end.
Quick Tip: Always test run your toolpaths in simulation mode to catch mistakes. A small error in code can lead to broken tools or a damaged workpiece.
Conclusion
A CNC milling prototype is more than just a test part—it’s a sneak peek into your product’s future. By carving out precise shapes from raw material under computer guidance, you get near-production-quality samples in a fraction of the time. Whether it’s an aluminum drone frame or a plastic mechanical gear, CNC milling can handle it all.
If you’re eager to reduce costs, speed up development, or simply see your ideas come to life, a CNC milling prototype might be the perfect solution. With the right design approach, material selection, and attention to detail, you’ll be amazed at how quickly your concepts transform into tangible, testable parts.
FAQs
Is a CNC milling prototype only for metals?
No. While metals are popular, many shops also mill plastics like ABS, nylon, or Delrin. The material choice depends on your prototype’s function, budget, and performance needs.
How long does it take to finish a CNC milling prototype?
It varies. Simple parts might take under an hour, while complex ones with multiple tool changes can span several hours or even days. Design complexity and machine efficiency play huge roles.
Which software is best for CNC design?
Popular choices include Fusion 360, SolidWorks, and Inventor. They have integrated CAD (design) and CAM (toolpath) functions, making it simpler to transition from digital models to physical parts.
Do I need a 5-axis machine to make good prototypes?
Not always. Many prototypes can be made on a 3-axis or 4-axis machine. The 5-axis is great for complex surfaces or reducing setups, but it may be overkill for simpler shapes.
Can a CNC milling prototype be used for final production?
Sometimes, yes. If you only need small batches, CNC milling can produce the final parts. In larger runs, methods like injection molding or die casting might be more cost-effective.


